Monday, 23 May 2011

Stamping heaven

Saturday finally arrived and I drove down to Ashford in Kent to attend the 1 day Lili of the Valley colouring day. You can see some extra photos on the post I have linked to. I had been so looking forward it.  This was essentially a "master class" for learning tips from the experts (Bev and Jacqui) on how to colour stamped images used in paper crafting.  Now I have several great blogging friends in the States who are the most talented artists (hello Michele, Linda, Bethanie, Shirley et al !) and I marvel at the images they produce. I however, have the colouring talents of a child, I joke not.

Well what a day it was....absolutely brilliant. I will show how I achieved this but just look below at one of my end results.....


The venue was the Ashford International Hotel. My drive took me about 1 1/4 hours and when I arrived I found the room set up with tables sitting 6 work to on. 40 lovely ladies had enrolled for the day. As in the blogging world there are such kind, friendly people out there in the card making world and everyone was genuinely so looking forward to the day.

There was a little shop set up next door to the working room with all the stamps, markers etc for sale. What was even better was that we were given 10% off all our purchases that day.

We were all given a great goody bag with lots of crafty treats in to take home with us.


The shop set up
The shop was open all day so there were lots of opportunities to part with our money. Lili of the Valley produce the most lovely stamps and we were even given a sneak peak of the new summer range being released in a few weeks time.
After meeting and greeting we went to start the class.


Each place was set up with a stamped image. The first we tried was a fairly simple image of a Christmas teddy. We all had an outline stamp of the teddy which had been stamped onto white card. The talented tutors Bev and Jacqui  showed us how to build up the colours and blend them. At first I felt quite nervous at doing this but it was incredible to see how it works.


This was my first image. He is not that great but for a first effort I was more than pleased. I regarded him as my test piece where I was learning the techniques of shading.

We then moved onto a slightly more complex stamp which was a boy themed stamp shown below.


Here I have started to blend his skin tones. We then worked through adding colour to his little boat and then to his clothing.


And here he is all finished. I started to understand more about making images appears more rounded by also using oil based pigment pencils to finish off. These made such a difference and really made the image start to jump out of the page.

All this work made us hungry so then it was time for a well deserved lunch break. We had an excellent lunch provided by the hotel. After lunch it was time to move on to some more complex images and the first we worked on was a boy and girl "love" image.


We worked through blending the flesh tones, clothes and the tree in the same way as we had with the other images. It was fascinating to see the images gradually come alive.
It was also interesting to see how different everyone's final images looked, every person had a slightly different end result despite using the same colours to work with. We all had our own colouring "personalities".

Below are the stages I worked through...


......until I had completed the final stage. I really love this image and in fact I bought this stamp as I will be able to use it in my card making for lots of occasions..Valentine's, birthdays, anniversary......

By now we were all getting a little more confident with our colouring skills and the last image we worked on was a really sweet fairy.


                                                     I really think she is such a cutie!

 So there we are, my day's work and I now have 4 gorgeous images to make up into some cards. I shall keep you "posted" as to when I have made cards using them and I will show you the end results on my blog. I may even start adding some of these cards to my Etsy shop. I also now have the confidence to apply my colouring skills to all the other stamps I already own.

I will enjoy being able to bring my stamps to life in a way that, up until now, I never could. It really was a day spent in stamping heaven.

Bye for now,

Jane x

Thursday, 19 May 2011

Happiness is....working in the garden with Billy

Today was bliss, yes real bliss.

Thursdays are not work days for me (lucky me) and the sky was clear blue when I woke this morning. The sun, even by 9am, was warm on the skin. It's so good when what I had planned for the day fits in with the weather. Today I had decided to go up to the nearby small holdings and buy some more summer bedding plants. As the weather was so glorious I could also start to plant them up in my garden.

I came home with no less than 3 trays full of plants.


These are just one tray of them. We are lucky to have very good local growers and I am able to buy good quality plants quite cheaply.


Amongst my bargains I bought some herbs. I bought dill, parsley, garlic chives and I spotted a cinnamon basil, which I have bought at Hampton Court Flower Show in the past. I bought 2, one for myself and one for my daughter. At £1.30 they were rather cheaper than the £4.99 I paid last year! Cinnamon basil has the most fantastic smell, I really do recommend it if you can find it. It also has very interesting red/brown leaves.

I remembered I had a lovely old terracotta planter, which my Dad had given me some time ago,which would be perfect to use as a herb planter.

My Dad had been given some of these years ago by a friend who worked at the time for a Council Parks Department. They are Victorian and were being smashed up for crocks as in the 1970s no one thought they would have any further use. Dad could only bring home a few, it's lovely he was able to rescue some, they are such super heavy quality and totally frost proof too. I also rather like the fact that they have some history to them. I often wonder what grew in them in their past life? I have 2,  one deep and one shallow.
Here it is before I gave it a good scrub clean...and yes my assistant was at hand to check!


Billy had a good sniff and then sat on the wall of my raised bed until I got out the water...he is not a great fan of water so at that point he took up another vantage point..


It was also a lot cooler for him in the shade of the table.


After potting up my herbs I needed to decide where to put them.


As we often eat out in the garden during the summer I thought they would look great near the table and also their scent can waft around as you move past them.

They are also near enough to my back door so that I can nip out and cut bunches while I am cooking. I LOVE using fresh herbs in my cooking. I adore snipping chives onto new potatoes and adding dill to salmon...yum! I also use lots of basil, I think that is my all time favourite herb. It goes into all my pasta dishes. I also have mint growing in the garden so that is always at hand too.


After I had finished the herbs I planted up a few other pots of bedding plants and then had a good sweep of the patio so that we are ready for dinner tonight...

 yes we will be eating in the garden...
and yes our darling Billy will never be too far away...
O what a blissful day!

I hope you are enjoying your gardens too? The prolonged sunny weather we have been experiencing here since early April has been quite extraordinary and I will confess, I just love it. The gardens are so advanced for this time of the year. I had to stop cutting my lawn as it is so dry. Grass does not like being too short when it is lacking water. Billy also loves it slightly longer.

 It's work for me tomorrow and then I am off on my stamping masterclass on Saturday, I will be back with news and photos next week. Have a great weekend and enjoy doing what you enjoy doing!! ;0)

Bye for now,

Jane x (and Billy)

Sunday, 15 May 2011

My card creations for celebrations

Now that is a tongue twister of a title!

Recently there have been several friend and family celebrations that I needed suitable cards for. I decided to have a card making morning and get them all made in one go. I thought I would share my latest creations with you and I have also updated my Etsy shop with a couple of newbies. I have been so busy recently that I had neglected putting any new cards up for sale. I charge postage only on the first card so any extra are enclosed for free. I have only shown UK postage rates but I am happy to post world wide, at cost, just contact me first through Etsy. If there is anything specific you would like made I can also list anything you would like made there or I can sell them direct. Most people do just buy directly from me, just use the "contact me" button in my Etsy shop.

The first card I needed to make was a thank you card.When the now Duke and Duchess of Cambridge got married a few weeks ago we were invited to a surprise birthday party in the evening, for my daughter's future father in law. We had a really lovely evening down in Sandwich in Kent and the hosts were Ns sister and brother in law. They made us so welcome. I thought it would be fun to make a cup cake thank you card as we all ate 60th birthday cup cakes for the occasion. They were were delicious. I wish I had taken my camera to show you them. Never mind, below is the thank you card I made.


These little cup cake cuties are very popular. For this card I used a cup cake backing paper and a pretty coordinating striped paper together with a delicate pink butterfly border.


Here she is in close up.


I decided I would make a similar card for my "stock" and this is shown below, on the left. I have left the front blank so she would suit any occasion, birthday, thank you, congratulations etc. She is for sale here in my Etsy shop


I shall also show you the 60th birthday card I made for N.


Men's cards are always quite tricky and I really dislike the usual "beer" themes. I use a lot of black and white in my male cards, it always looks quite striking.

I also made the one below for my stock


Here I used some mini playing cards and had fun with one of my new cutters (a recent birthday present) to make the silver focal frame.
This one is also for sale here


Next month, in the UK, it's Father's day and as I have a holiday coming up just before I thought I would be organised and get a card made for my dear Dad. I had recently been bought (more birthday treats) some very pretty, but manly enough , blue ribbons by my son's GF and decided to use them here. I also used one of the fimo plaques which I bought  from a very talented artist at a craft fair. Below is my end result.


I used a  pirate teddy in his ship and I think the blues are very "sea " like. I had not thought of using ribbons before on a man's card but I rather like this.


The next cards I needed to make were anniversary cards. My colleague at work is celebrating her silver (25th) wedding anniversary in a few weeks time and will be taking a 3 week trip to the USA with her husband. I decided to make a larger card than my usual 5x5" square cards and to add some special touches, such as silver vellum paper. There are lots of added details on this card and I tried to keep to the theme of silver.


I also decided to take the opportunity to make my dear Hb's card for our Pearl (30th) wedding anniversary which we celebrate in July. You will notice I have used some more of the lovely silver vellum paper (us crafter's never waste a scrap of any papers!) I also used a silver card as the backing card which gives a great overall shimmer effect.
I used some lovely buttons (yes I just cut the shanks off the back) to spell out LOVE. I think the dark red against the silver of the card looked quite striking.


I also decided to make an anniversary card for my stock which I have for sale in my Etsy shop if you click here.
It is more of a general anniversary card but could still easily be suited to a silver or pearl anniversary.

Before I close this post I want to tell you just how excited I am about next Saturday, 21st of May. I have managed to secure a place on a "colouring" stamping day. It is being run by the firm who make gorgeous "Lili of the Valley" rubber stamps. Their master card makers will be teaching. We will be learning how to colour stamped images, using Promarker pens, more like the "pros" can do it. I have attempted a few coloured images, they are very tricky to do. Below is the card I made my Mum for Mother's Day this year where I have stamped and then hand coloured the image with Promarker pens.
Hopefully once I have been shown the secrets of the pros I may get some good results. I will take my camera and show you how I do.

 Finally there is one more card I have listed here in my shop, very apt for this time of the year and the upcoming tennis season....
Mmmmmmmmmmmmmm strawberries! Have a great week everyone and I am glad Blogger seems to be over it's "glitch".

Bye for now,

Jane x

Tuesday, 10 May 2011

Ne're cast a clout til may be out

Don't worry the title is not a typo, it is a lovely old English proverb which is now recited in a slightly more modern way, "Don't cast a clout til may is out". Perhaps I also need to explain that a clout is a piece of clothing! Us Brits do have some very odd words, I know.

 For many years I thought that this saying referred to the month of May. It is warning us to be aware not to taken in by the occasional early warmth of spring; there could still be cold weather or frosts until the end of May. In other words keep your winter clothes to hand!  Recently though I was made aware that this old saying can actually be taken another way and the "May" could actually mean the may (flower) of the hawthorn tree. Hawthorns are seen in abundance in our hedgerows. That would change the meaning of this old proverb to the need to be aware of a cold snap until the may flowers are in bloom.


Well this year here in Surrey the may was in full blossom at Easter, so still in April.  This photo on the left was taken over the Easter weekend. The hedgerows were thick with lovely may blossom. The exceptional April weather we have had has brought everything on so fast.


This early growth has been remarkable in my own tiny, very sheltered back garden. I have foxgloves in full flower which I do not normally see until mid June. I have grown them for nearly 30 years and they always self seed and form lovely clumps in different parts of my garden.


I can remember my childrens' christenings in June 1986 and 1989 and the foxgloves (digitalis) were a feature in the background of the parties we were able to hold in the sunshine in our garden.

On the right is a photo taken last weekend.
I am quite astonished to see them so early this year, particularly after the savage winter we had.

I have them in shades of dark pink,


white,


and pale pink.
I love their stripey throats which keep attracting the bees all day long. I am also fascinated how useful this plant still is to modern medicine. Digoxin, which is used to treat heart irregularities is still produced from this wonderful plant.

In the sunshine whilst I was taking these photo I spied someone sleeping behind my hosta pot

You can't see anyone until I zoom in behind...
Just look who I found.....

my darling pink nosed Billy, fast asleep and covered in soil and quite oblivious to all that was going on around him! This is one of his favourite sleeping places in our garden. The only trouble is that he is so well hidden that sometimes, when watering my pots, I forget he is there. He often jumps out, shaking water drops from his coat!

My garden is really coming along and I recently bought some bedding plants which will be potted up very soon.

Amongst my purchases is a new black petunia, it is the first true black to be grown commercially. I will watch it with interest this summer.

So whether the correct meaning for the old proverb, "Ne're cast a clout til May be out" is the month of May or the may (flower) I have cast a clout already and my garden is looking more summery every single day. This glorious weather still continues and this afternoon it reached 28oc in my sheltered back garden. It appears to be summer in spring!

The joys of nature (and the weather). Billy and I are so enjoying our garden. I hope you have lots of signs of spring in your gardens too.

Bye for now,

Jane x

Thursday, 5 May 2011

My stone setting project...at last!

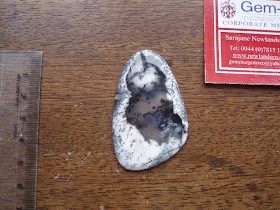
Do you all remember this...?


For those of you who regularly read my blog you will remember that many weeks ago in this post I mentioned that my next project at my silversmithing class was to set an unusual stone. I bought this lovely piece of agate. After many weeks of work I can finally reveal the finished piece.


Here it is....I am very pleased with it. I have shown it here on a chain I already own (no not handmade, I still have to get the time to make one!)

I know that many of you really enjoy seeing the design process of my silversmithing so I thought that I would take you through it in this post.

The first thing I had to do was decide on the type of setting I wanted. As the stone is quite stunning by itself I did not want too elaborate a setting. The cut agate has a wonderful depth to it, almost as if "looking through a forest". I had the idea of looking at it through "branches" which would serve as claws. I searched through lots of books and finally decided that a silver flattened wire border which did not quite encase the stone was the way for me to go.


I sketched some designs and then made some practice pieces first in metal wire and then in copper so that I could get a feel of how silver wire would behave.


I finally decided that "icicle" type shapes would really suit my stone.

This is the blue wire I practiced with first and then I tried forming the claws in copper.


 I also got an idea of how the claws could lie across the stone.


Before I could attach any claws I had to make the base setting for the stone using silver sheet. I needed to make a "bezel" setting which would hold the stone in place and also serve as an attachment for the wire claws.
 The next job was to use silver bezel strip to make the bezel setting. This is made of very fine silver which can be easily bent. The strip was bent tightly around the stone and then cut and the join soldered. The whole bezel setting then had to be soldered to the silver base. Soldering the bezel strip on was a nightmare as it is very thin in comparison to the silver sheet and very easy to melt.

Once the bezel setting was in place on the silver sheet I cut round the shape with a saw.

After lots of filing smooth it was time to form the "claws" and solder them to the sides of the bezel. Again this was incredibly fiddly and it was so difficult not to melt the thin bezel sheet.


After several small stages of soldering I had all the pieces in place.


I decided that I wanted my chain to be hung from behind the pendant and come up at a less acute angle than that seen by hanging it from a bail at the top. To achieve this I had to make 2 small curved pieces of silver and solder them onto the back of the setting. This was not easy and keeping those 2 pieces in place took lots of balancing! The hole in the back was to enable me to push the stone out before it was permanently fitted.
Next it was time to polish my piece and I used a combination of hand, motor and barrel polishing to achieve a mirror finish.
Finally I put the stone in place and gently bent over the bezel setting and the claws. This was quite a slow process as it was important not to split the bezel and also to get a smooth finish. After some final filing and sanding, using wet and dry paper, my pendant was finished.


Here it is again in close up on the  chain...and yes at some point I really do plan to make another chain. If only there were more weeks in my jewellery class year! There are only 7 more weeks left of this year at my class, I think someone has been making time fly by. We are now working on an enamelling project which I hope to finish by the end of term. Fingers crossed. I will keep you  posted and hopefully have something new to show you at the end of June. I really enjoy sharing all my "making and doing" with you all, I find this blogging world such a kind, friendly place to be. Thanks always for visiting me here and for all your lovely comments you take the time to leave me. Hello also to my "silent readers" - I really do appreciate your visits.

Sending you all some more of this most wonderful sunshine we have now enjoyed  for over a month. Bliss!

Bye for now,

Jane x