Monday, 31 August 2020

Seaside memories

                 Today is the not only the August bank holiday but the very last day of August. This will be our last bank holiday until Christmas. I always feel that it marks the moment where I notice that there is a change in the light and more of a nip in the air in the mornings and that we have reached the last weeks of summer.  It is also time for my fortnightly design team post for Visible Image and I thought that today I would share a make to remember the hot sunny days of this strange summer of 2020.
I love the seaside and I am lucky that my daughter lives yards from the beach so I get a regular blast of seaside air, sand and shells on our visits.

I decided to make a little set of artist trading coins to trade with my little granddaughter and to give us some summer memories to look back at. She and I love the 
Mythical mermaid set, for not just the gorgeous mermaid but the lovely dolphin stamps which come with the set
This is what I got up to;
I took a sheet of mixed media card and added some Brushos and water to make a seaside inspired background.
 I then used the 
Fibres stencil with some salty ocean and broken china distress ink to create some waves.

 I stamped the fish from Dare to swim 
 randomly, using first and second generation stamping, over the card using a Kaleidoscope multi colour ink.

I then stamped the dolphins and coloured some blue
 and some grey. I always like to stamp extra as they can be used in future projects. 
 I die cut the coins and then added some bubbles and waves stamping using the stamps from the mermaid set
  I yellow embossed "calm" from the 
Create your calm stamp set. I added glossy accents to the bubble which you can see in the finished photos.

Finally I stamped the little shells and critters from the mermaid set onto inky mop up card and card from my stash and cut some out. 
 Here are my finished coins
 with a close up of each one.


 and one final shot.

All the Visible Image links are listed below

Visible Image group page on Facebook. Our friendly Group is here ...it would be lovely to see you there. You will see lots of gorgeous makes by the DT and customers to inspire your own creativity.

The main Visible Image Facebook page is here; there are regular giveaways...open world wide. Do check out the Facebook LIVES and videos where you will be able to see lots more samples and ideas. 

Their Instagram page can be found here

Pinterest here

And once again the shop web site is here; where all their gorgeous stamps and stencils can be purchased.

Plus a little heads up that this week you will start to see some samples using the new Christmas stamps and stencils being released....ho ho ho! Do check out all the social media sites where you will also find some sneak peeks.

Thanks so much for stopping by.


Back soon,

Bye for now,

Jane x

Wednesday, 19 August 2020

Thanks to Tim Holtz

As you well know I have been an admirer of the professor of all things inky, Tim Holtz for over 10 years. I use his products on every single thing I make, even if it is just to distress ink the edges of a card. His creativity and enthusiasm for crafting is endless and he has continued to inspire me over the years through all his work; his annual tags he made, his amazing new products and I was even lucky enough to attend one of his workshops in the UK 3 years ago. If you missed that post you can see it here . During lockdown there was one good thing that happened in my inky world, the weekly Facebook Lives which he gave . He so generously gave up his time over 18 weeks to share tips and tricks, 8 of which were Q and As on products which were so useful.  They were a joy to watch and are still available on his Facebook page or website to view now. He also
encouraged everyone to be inspired by his techniques, to get creative and to upload makes to Instagram using the #timholtzdemo. I loved being involved and joined in with thousands of crafters world wide. I had heard Tim mention that each week he would choose 3 winners but that was not why I joined in. As you all well know being creative and getting inky is what makes me me. I needed no excuse to get involved.

What I didn't expect was to be chosen as winner in June. You could have knocked me down with a feather when I got a message from Tim telling me and also letting me chose a stamp set to go with my prize. I was so excited and although the mail during this awful pandemic was a while coming my wonderful prize arrived last week.
Just look at my goodies.
But best of all Tim also included one of the tags he had made during the Lives...and I could not believe that it was my favourite of all those he made. 
I have a " thing" about images of toadstools (as well as pigs, mermaids, the Man in the Moon, Father Christmas, snowmen, strawberries and sea shells, OK now you know all my secrets!). In fact when I saw Tim make this tag it inspired me to buy the gorgeous field notes ephemera pack to go with my field notes stamp set (one of my most used sets of this summer).
I will treasure it.
The stamp set I chose  for my prize was The Professor 2...for me it would be a reminder of such pleasant crafting times.
I decided that my first make with this set would be something I could keep and look back at.

I thought I would also blog and share a step by step for this make to give something creative back.
I chose to work with alcohol inks as they are such a fun medium and I managed to finally buy some more Yupo. WARNING; there are lots of photos so if you just want to see my finished project please scroll to the bottom of the page.

I have shared all my tags and makes over the summer on my Instagram page here. I don't blog everything I make as much as I love blogging it would occupy far too much of my creative time. So if you would like to see what I am up to I would love to see you join me over there.

So this is what I got up to.
I used red and blue alcohol inks on Yupo for my  background as I knew I would get some dark purple in there too. I wanted to challenge myself to do something very different.
I die cut myself a tag from this background and also a plain white cardstock tag. I used the fun lift ink technique (you can check the process out in Tim's videos.) I have always enjoyed this technique since Tim first shared it and the ink a few years back. I knew I would get a dark and light version of my stamping so this sparked my ideas for my pair of tags.
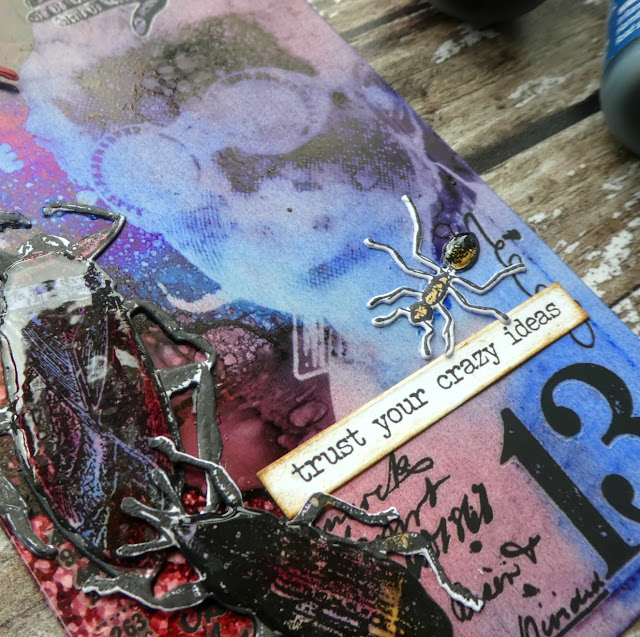
 They would be the "dark" and "light" versions of my crafting. I think Tim heads toward the "dark and grungy" and I head more toward the lighter side!  I got a "ghosted" image left on the alcohol ink background and then stamped the ink taken off onto  my white tag. I  I added a few distress inks to my "light" tag and some remnant rubs to both. My "dark" tag had the No 13 and the "light" had butterflies and the No 12.
 I wanted to add some of my entomology critters too. I have the stamps and dies for this set and it has provided endless fun for me this summer. As you well know I am girl who always loves adding details and stories to my crafting. 

 Once painted with some distress inks and glossed with glossy accents they really come to life. I also like adding some glitter pen to the butterfly wings before glossing them.
 We have also recently finished watching "Dark" on Netflix. We loved it but boy is the plot confusing until virtually the last episode of season 3! I give nothing away but I was inspired to add the concept of time travel so I added some cogs and clock hands.

  One butterfly was playing with the settings !
 The beetles and ants walked onto  my dark tag . I thought the "stamp here" was a fun pun.....but no I would never stamp on such a beautiful beetle, I am also a lover of spiders too!
I finished each off tag with a very apt tiny talk sticker. 
  Here are my finished tags.


My light tag has the butterflies and bee happily making time fly (the hands are movable) 
 However the beetle and ant are busy turning back time. I'm not sure which I prefer!


Here is one final shot of the pair. 

I would like to enter my tags into the following challenges

Simon says stamp Monday grunge it up
A vintage journey tag you're it
Creative artiste anything mixed media

So huge thanks to Tim for his kindness, creativity and generosity and to Mario for all he does behind the scenes. Thank you guys, you really do rock. 2020 will certainly be a year to remember.

Thanks to everyone who read through to the end of this rather long post!

Take care, stay safe.

Back soon,

Bye for now,

Jane x

Monday, 17 August 2020

A Visible Image sun and moon

Good morning, it's time for my fortnightly design team post for Visible Image. Today I sharing a make using the delightful new set Happy day
Now the first thing I noticed when I saw this set is that I could also see a "Man in the moon" in the face or is it just mad me??
I love moon gazing and often take photos of it.
I decided to make a "Mother Earth" using the main image and then a "Man in the moon" tag to prove I was not mad!
This is what I got up to;

I used salty ocean and mermaid lagoon distress inks through the meshing around stencil

and then added some green distress inks through the lava stencil

I then die cut a circle using a folded sheet of card, not cutting through the very top so that it could open out.
I stamped the face adding the funky eyelashes as shown
I stamped the eyes, mouth and some of the shapes, coloured them with glitter gel pens and fussy cut them out. 
Here is my "Mother Earth".

For the moon tag I used a scrap of black card which had been inked with mermaid lagoon, antique linen and picked raspberry distress oxides. I stamped and blue glitter embossed the smile word and coloured it in with white pen.
I repeated the same process as I used to make Mother Earth and then cut around the outline, cutting off the lips to make the Moon shape.
 I cut out the lips and after colouring them with red glitter gel pen glued them back further in. I paper pieced the eyes which I had coloured with gel pens.
I stuck him to the tag base. I then stamped extra some stars and moon as finishing touches. 

And finally here are Mother Earth and the Man in the Moon together..it was such a fun project to make!
I would like to enter them into the following challenges;

Simon says stamp Wednesday midsummer blues

All the Visible Image links are listed below

Visible Image group page on Facebook. Our friendly Group is here ...it would be lovely to see you there. You will see lots of gorgeous makes by the DT and customers to inspire your own creativity.

The main Visible Image Facebook page is here; there are regular giveaways...open world wide. Do check out the Facebook LIVES and videos where you will be able to see lots more samples and ideas. 

Their Instagram page can be found here

Pinterest here

And once again the shop web site is here; where all their gorgeous stamps and stencils can be purchased.

Thanks so much for stopping by.


Back soon,

Bye for now,

Jane x