Showing posts with label chain making. Show all posts

Wednesday, 6 February 2013

I'm in(to) chains

I am back with another update from my silversmithing class. Boy am I having fun making chains! As silver is so expensive now our teacher suggested that we practiced our chain maille and chain making techniques using aluminium jump rings. Not only are these relatively inexpensive but they come in a multitude of colours too. I ordered some and this is what came in the post.
For our first efforts we were shown the basic chain maille link and I decided that I would use plain and the black links, it also makes it easier when learning the technique to use 2 different colours.
Our teacher gave a demo and then provided us with a handout and it was time to get out the pliers and have a play.


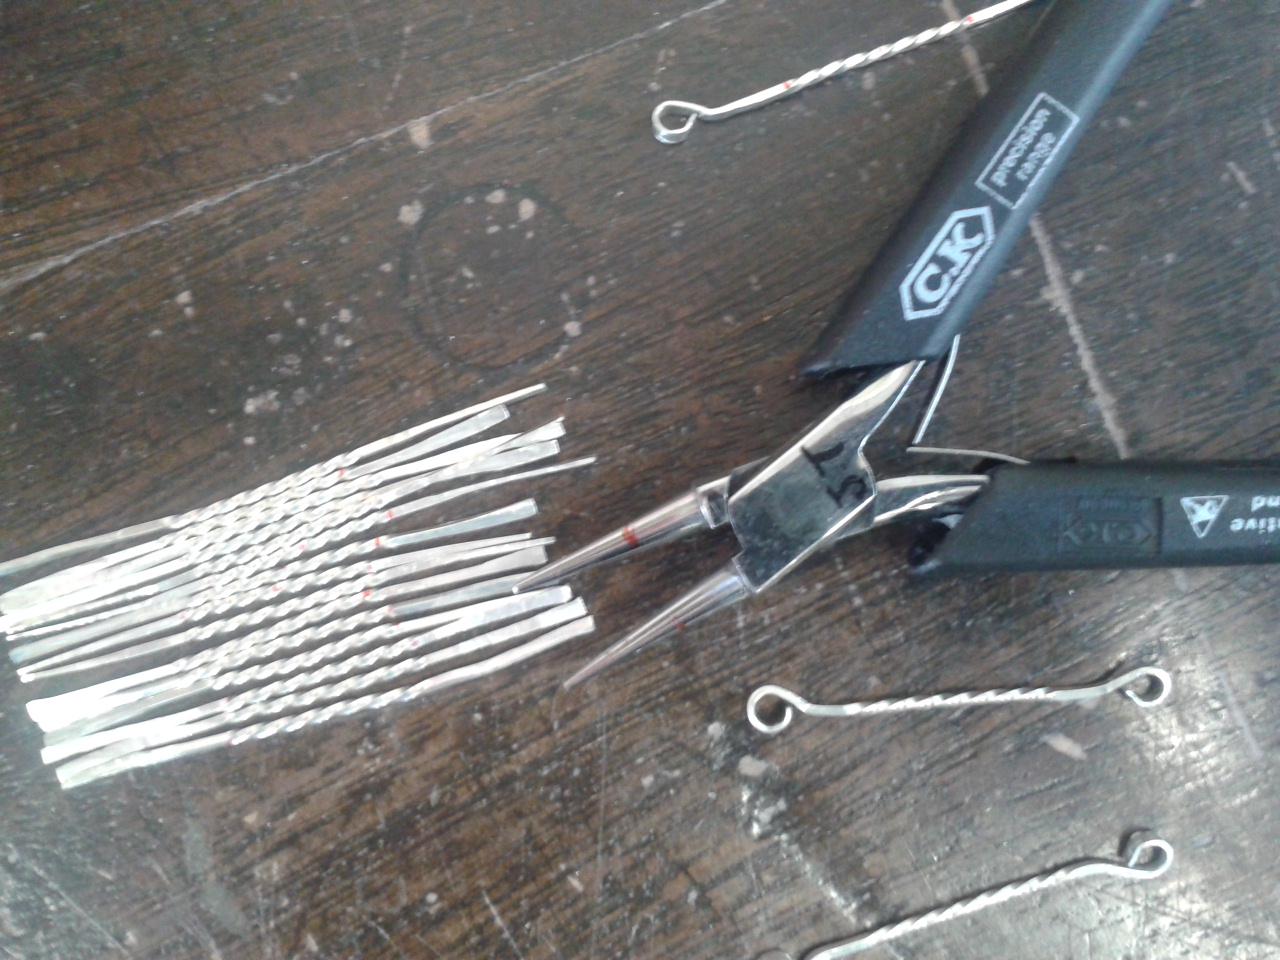
It was a case of making up sets of 5 links called chainlinks and then joining them and believe me this was incredibly fiddly! In medieval times they would have linked hundreds of these up to make protection under armour. It must have take so long.

The following photos show me making up my links.


Once I had assembed the links it was time to join each of these links together into a chain and this was when it got even fiddlier!


Very slowly a length of chain started to appear


Now at this stage I sent a photo to my sister in law who then asked if my brother could commission this as a bracelet for her birthday. I was delighted to do so and after a few weeks I had finished the bracelet. I even managed to get a matching black aluminium clasp for it. As always jewellery is so tricky to photograph and this is prettier in the flesh but here is my Ta daa moment ......


It does not look very good here but on the wrist it really hangs well and also is super light. I tried taking a photo of it on my wrist but did not succeed. I have also started making one in the silver and blue. We have also been making a box chain and a Persian chain and they are also coming along really well. I will show you those soon. Our next project is to make a piece of  Mokume Gane, the Japanese technique which fuses metals into a wood grain effect. It looks very interesting, have a peep here. Obviously due to cost we are only making a small piece but it may be enough to make into a pendant. We will be fusing copper, silver and brass sheet together. Our teacher really does set some wonderful projects.

My card today is the card I made for my sister in law. For the first time I inked up one of the mermaid Lili of the Valley stamps which I bought with some of my winnings from their blog. As you know I love mermaids and I just love these stamps. I think they are one of my absolute favourites. I have 2 of their new mermaid stamps and this one is the single mermaid.


Isn't she a cutie and she colours up beautifully.


Here she is in close up. I coloured her with my Promakers as always. I framed her in my gorgeous Spellbinders floral oval frame die cut.
I used lots of sea themed embellies including die cut shells, an anchor charm and lace to resemble netting.


I also used LOTV sentiments and some Baker's twine. I would like to enter my card into the following challenges;

Natalie and Amy Something old/something new #6 my old is my LOTV sentiment and the new is this fab LOTV mermaid stamp.
Stampin for the weekend Something metal my metal is the anchor charm
ABC Card Challenge G is for going dotty
Allsorts #192 Let's get cute
Totally Gorjuss Anything goes with lace #169
Papertake Weekly anything goes
A+T emerald faeries love #40
Ladybug Crafts Ink Girlie
I love Promarkers Happy Birthday#154
Bunny Zoe anything goes


I have take a day off work today to meet up "halfway" with my darling daughter for ladies lunch and a spot of retail therapy. She finished the last of her hospital medicine placements yesterday, this forms the first part of her GP training.  Tomorrow she starts 18 months of GP based training. This means that in 18 months she will be a fully qualified GP. Yahoo! It is such a long training and contrary to what the press would have your believe our junior doctors really do give their pound of flesh with their work. They are such a dedicated bunch and work long hard shifts. She is at last saying goodbye to 12 day shifts, nights and 14 hour days. Her friends who have decided to do hospital based specialties will still have these to do. Medicine really is a vocation and thank goodness there are people out there ready to dedicate their working lives to looking after our physical and mental health.

Well I must be off as I need to drive to Guildford for our lunch date. Welcome to February everyone, I have even noticed in the last few days that it is not getting dark now until 5pm. The daylight is lengthening at last. Thanks for visiting my little nook in Blogland. For those of you in the UK it looks like another icy blast is heading our way again so keep snug as you craft.

Back soon,

Bye for now,

Jane x

Thursday, 17 January 2013

Chain reaction

Hello everyone, as promised I am back to share with you my recent chain making project from my silversmithing class last term. Before I do that I just wanted to share a little bit of cheerfulness as here is my daffodil yesterday.
Yes two more flowers in bloom ...and some sunshine ;0). My hyacinth is also unfolding and that glorious smell is infiltrating my kitchen. The sunshine is deceptive though as it has been freezing cold since the weekend and we did get a dusting of snow on Monday. Yesterday barely got above freezing point all day.


It's so lovely to have these growing on my kitchen side and even better to see the sun shining.

So back to chain making....for this project we were shown a great technique using square wire. Square wire is really great to work with as you can get some really interesting effects with it rather than using the more commonly used round wire.


We first had to saw off 5 cm lengths of square wire and then measured them carefully as we were going to add a "twist" to the centre of each piece.


These measurements were marked on the wire. The wire was held in a vice and 6 half turns using parallel pliers made the pattern you can see here.


I then filed the ends of the wire pieces and flattened them slightly so that I could form them into the curved ends as shown. To do this I used my round nosed pliers. These curves are used to join each piece via a jump ring. To keep them secure I also soldered them.


Here they all are with their rounded ends. To join each component together we next had to make some jump rings. These are always fun to do....


I wound round wire into a coil using a hand drill. A mandrel had been put into the jaws of the drill and this ensures equal sized round jump rings.


The coil of wire is removed and stuck to a piece of masking tape. This holds the coil steady for sawing.
Then it was a case of hand sawing through the coil, all the jump rings then fall off when the tape is removed.


Here are some of the jump rings before I tidied them up with some light filing. It was then a case putting each component together to form the chain.

I also used one of the twisted links to fashion a clasp shown in the 2nd photo on the right below.
Are you ready for a ta dah moment................
OK but this is so hard to photograph


It is a lovely long chain and much prettier in the flesh.  I showed this to my darling daughter and yes she liked it and yes she has given it a very happy home ;0) At my class now we have started making other types of chain including chain maille. These are looking really good but OMGoodness they so fiddly. It will take a few weeks to come together but I will show and tell at some point.

Today's challenge card is one I made to cheer up a very dear friend of my Mum's who is sadly not well at the moment and in hospital for another month.  I understand that it brightened up her day and that makes me very pleased.
The stamp is Tiddly Inks, Love Grows. She is such a cutie. The card base is this most unusual tea pot which I found in good old Wilkinson's. They have a great craft section in my local store. She is coloured with Promarkers and highlighted with Prismacolor pencils.
The die cut is a newbie for me, Spellbinders floral ovals which I love, love, love.
I also punched some MS butterflies and a Magnolia sentiment. The bling jewel on the lid is another winnings from the very generous Tracy of Dies to Die from.

I would like to enter my card into the following challenges;

Tiddly Inks Anything Goes
Papercrafting Journey Anything Goes
My Mum's Craft Shop Anything Goes #1
Natalie and Amy My favourite things
Crafts and Me Something new #116  I have never made an embossed floral die cut. I only got my Big Shot for Christmas and I am enjoying playing with it. It has been quite tricky to get the embossing correct, I had several wasted ovals!
Inky Chicks Anything Goes #1
Stamping Sensations Friendship
Forever Friends Fortnightly challenge #53 favourite embellishment my favourite embelli here is that lovely spotty button in the centre which I added a ribbon to.
Bunny Zoe's Crafts  Anything goes
Creative Inspirations #197 one for the girls

We have a special weekend coming up as it is my Hb's birthday on Sunday. We have tickets to see Matilda at the Cambridge Theatre in London on Friday and then on Sunday the family are coming over for a birthday lunch to help us celebrate. The only thing that could put a damper on all this is that we are forecast some heavy snow here on Friday night and Saturday. Fingers crossed that it will not affect us too much. Enjoy the weekend when we get there and thanks so much for all your visits and the lovely comments you leave me here. Keep warm.

Back soon,

Bye for now,

Jane x