Showing posts with label jewellery. Show all posts

Saturday, 14 April 2018

A jewellery reveal

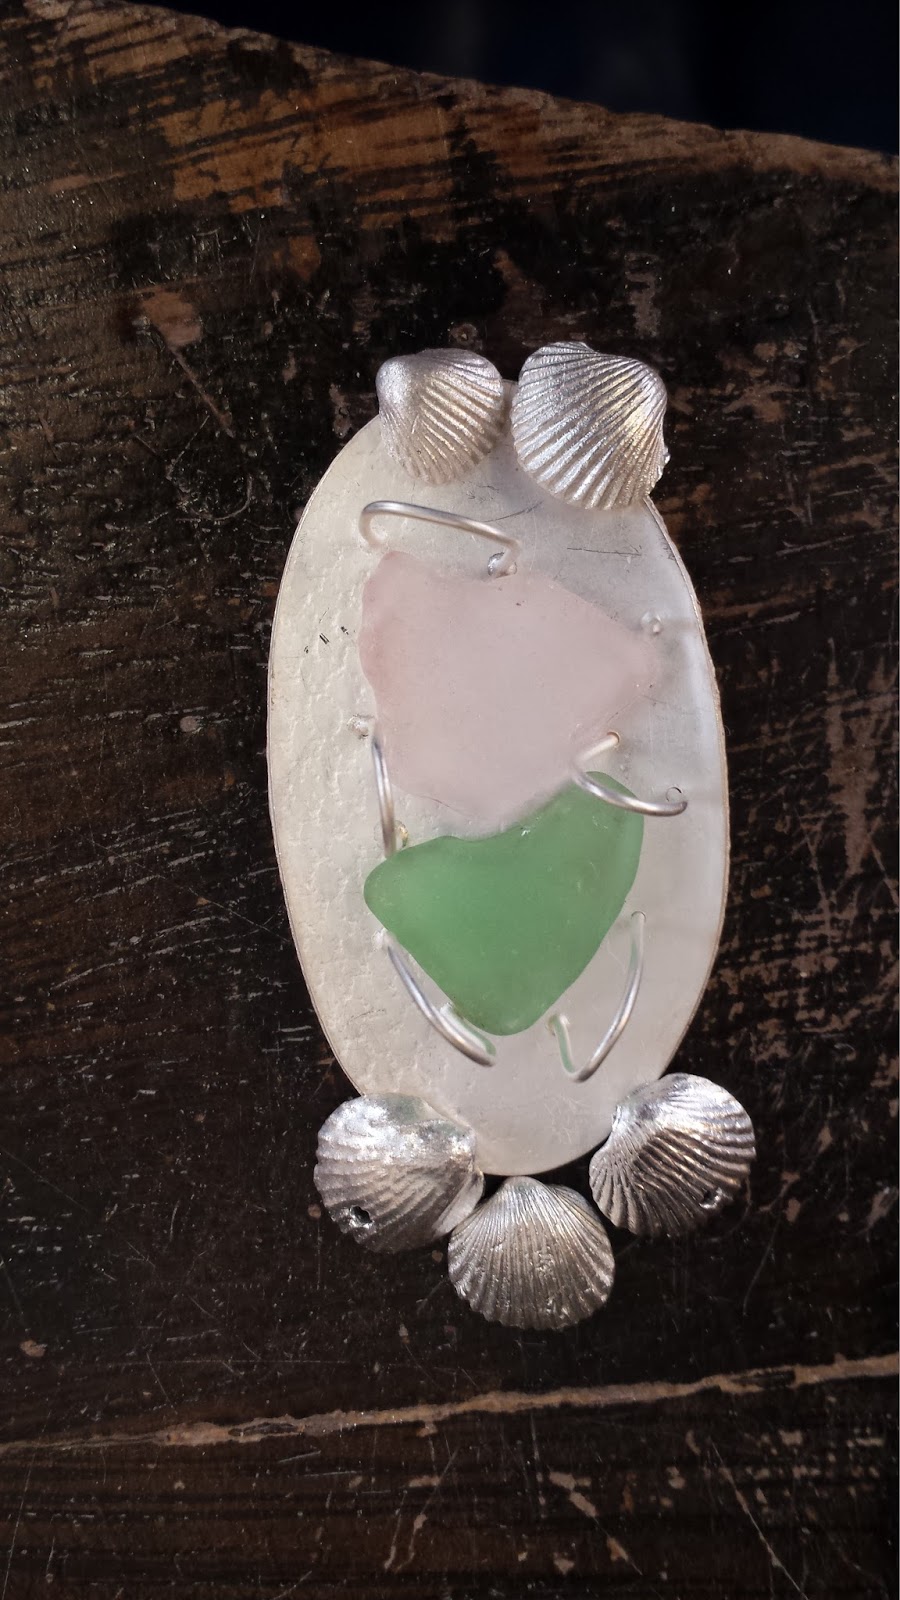
Now that my daughter's birthday has been and gone I can finally share one of my latest jewellery projects from my silversmithing class. It was a real labour of love but worth every second.
I bought some lovely stones a long while back and made some silver pins for them.

Next I made a toggle fastening
and then it was time to make lots of links for my chain from silver wire. First I made rings, which I soldered. Some I pulled them ovals and then flattened them all through a rolling mill. This took lots of 2 hour classes!
I then put together my design. First I had to saw through the ovals to put on the rings
and then re soldered them as I made my chain in stages.
Finally I polished everything before wiring in the stones. 
So here it is

with a couple of close ups

Made with lots of love xxx

My card today is a  near white on white wedding card. As today the sun is shining and the sap is rising in the plants I added in some greenery. Everything is looking lush outside and I am looking ahead to summer and the wedding season for my cards I make for Dotty's Tearooms. The image is a Lili of the Valley simply print. I glittered up their headdresses. The stamped sentiment is also LOTV.
I would like to enter my card into the following challenges;

Fussy and Fancy 3/3 add a sentiment
Simon says stamp Wednesday add some texture
Happy Little stampers 2/3 anything goes with dies
Creative moments 2/3 anything goes
That's Crafty 2/3 circles I used a circular sentiment.

Thanks for stopping by and enjoy a lovely weekend. We are off to visit friends in Essex, the return of the sunshine is an added bonus. 

Back soon

Bye for now,

Jane x

Thursday, 25 January 2018

Water casting fun

I have been a little AWOL this week as I had a rather special girlie staying. Daisy and I had some magical days and as the weather was horrible we crafted non stop. Today though I am going to share another of my silversmithing projects from last year which got forgotten about with all the excitement of Christmas. 
A couple of weeks ago I showed you my up-cycled Murano pendant. If you missed that project you can see it here

With every project I make there are always little bits of silver left over. As I have been attending classes for over 16 years in all that time those little pieces of silver have turned into a whole bag full of "waste" and our tutor decided that our valuable silver could be turned into something usable using a technique called water casting. 

Boy was that fun...but without proper safety measures could be really dangerous.
We put some of our off cut silver waste into the furnace and melted it. We then carefully took it out using long tongs protected by aprons, gloves and gauntlets. This photo was our tutor showing us how to hold the container.it was cold at this point..when we actually did the technique we were well gloved up. 
 Once the silver came to temperature and was liquid we tossed it into a water bath.
 
 Out came these very cool, rather organic shaped pieces of silver. These pieces below came from 3 separate water casts. I could see leaves, branches...
and a "rose". Can you see it too?
I cut off the spare silver under the "flower."

 I then designed myself a pendant....as I could also see leaves and a stalk in my water-cast pieces.
  I soldered my "leaf" under the bud....looking more floral at this point.
 Then saw a "stalk" which I filed down and soldered this on too. 
I then filed everything and soldered a hanging loop to the back.
After a final polish my "rose" pendant was finished.

Here it is.

My card today is one I recently made having enjoyed a day being able to play with my Lavinina fairies. This one is for my sister in law 's birthday.  I made an oxide background using black soot and antique linen. The sentiment is a Tim Holtz die cut.

I would like to enter her into the following challenges;

C.R.A.F.T 1/2  distress your project/vintage
The house that stamps built 1/3 anything goes
Creative Moments 1/3 anything goes
Let's Craft and Create 3/3 anything goes
Noor UK anything goes
Shopping our stash 1/3 birthdays

How quickly the week is flying by. It is nearly the weekend again. Thanks so much for stopping by today and for the kind comments you take the time to leave. The sun seems to have returned today thank goodness and today was quite mild and sunny. Let's hope it hangs in there for a good weekend.

Back soon,

Bye for now,

Jane x

Thursday, 15 December 2016

Christmas makes

I attended an enamelling course recently and made some pendants. I really enjoyed playing for 4 Monday evenings. I love the way crafts cross over and I was intrigued to find out that rubber stamps could even be used for creating enamel pieces! I took a couple of photos which I thought you would find interesting. First I sieved a white layer of powdered enamel over the copper circular pendant. This was then put into a kiln to fire.
Once it had cooled I used the smallest snowflake from the Snowman Jack Visible Image set  and stamped with archival ink. I then added some blue enamel powder which sticks to the ink. The pendant was then fired a second time
and below is my pendant after firing.
I also made some other pendants which I will make into jewellery at some point. They are sooo hard to photograph!
 The one below has lots of layers and was fired in several stages. I added a glass bead layer and gold micra powder. I can just about give you an idea of the depth with this photo but IRL it is magical. It is like looking into a pool.

I have also made some Christmas decorations for my children's homes. I decorated a 2nd VI Monolith which I gave to my son and his girlfriend.  The first one I shared here last month and is with my daughter and family.
I started with some gesso and Joanna Sheen ivy die cuts on the front
and on the back a lamp post and Cheery Lynn icicle die cut

I added lots of washes of Decoart media paints.
Then I stamped, embossed, paper pieced and cut out Snowman Jack. I added gems for eyes and buttons and coloured his nose and arms.

 This is the front.
I added lots of Decoart snow and glamour dust to the base for lots of sparkle just as I did for my snowflake monolith which you can see here in detail.
Below is the back, complete with glittered mittens and the fun sentiment.
These are my last guest design pieces for Visible Image. They have just made some new business decisions for 2017 which means they no longer need the extra 3 new design team and 2 guest designers they took on in September. It's been short but very sweet to guest design for them and I have lots of lovely new VI stamps still to play with. I wish them every success with their new crafty adventures ahead. I will of course still love creating with their gorgeous stamps.


I would like to enter my Christmas Monolith into the following challenges.

Mixed Media World Winter Wonderland
A Vintage Journey Winter Magic
Simon Says stamp Monday Let there be snow
Simon Says Wednesday gift it
Craft Stamper take it make it snow and ice
        Mod Squad Use chipboard my monolith is chipboard/MDF
Rhedd's Creative spirit December
WOW embossing powders December, winter
Emerald Dare Winter Wishes
Creative Artiste anything goes
                                     Happy Little Stampers untld anything goes with dies
                                            Christmas at sweet stampin inspired by a song mine is pretty obviously as the words are on the back! ....Baby it's cold outside by Tom Jones and Cerys Matthews. The funny thing is that it has turned ridiculously mild here again..it was 16c in garden yesterday!

We had a mammoth wrapping session yesterday and the presents are mostly done. I also managed to make my crackers and will share them with you very soon. Today I am taking a day off to have lunch with my best friend Karen and share some festive chat, our last for 2016!

I hope you are getting your lists ticked now?

Thanks so much for visiting and for all your kind comments. I appreciate just how busy everyone is at the moment. I would also like to extend a very warm welcome to my newest follower. Thanks for joining me on my creative journey here at Jane's Journal.

Back soon,

Bye for now,

Jane x


Monday, 5 September 2016

A Daisy necklace

First of all can I thank you all so much for all the lovely comments and best wishes you left on my blog and Facebook on Friday wishing me well with my Designer news for Visible Image. I was so touched by the kindness expressed. I am still buzzing with excitement and looking forward to creating for the Create and Craft shows on TV later this year. Visible Image are also launching on USA Create and Craft this week. If you missed my post you find it here.

We had the pleasure of a visit from Daisy and Co this weekend. As we still have Bear (our son's dog) staying they came up to us on Saturday afternoon. I'm not sure Bear would have been very comfy our car for an hour and a half.

 When I last saw my DD she told me that Daisy keeps putting on her necklaces.  I have made my DD lots of lovely lampwork glass bead necklaces over the years and she was concerned they might get broken. I offered to make Daisy something suitable for a 2 3/4 year old and that's what I planned to have ready for Daisy's visit yesterday.

I have already made Daisy a silver daisy necklace for when she is older so I needed something "beady".
I had lots of different ideas I  knew that it needed to be a long one, 22" to be precise so that it was like Daisy's Mummy's. Also it needed go over her head. I looked a "child" beads like fish, stars etc on Ebay and found some rather nice bright coloured acrylic hearts, which I bought.
I decided not to use the orange...is it just me or is orange a rather odd colour??
I set up these colours and they sat on my workbench for a few days whilst I played with different spacer beads but I really didn't get anywhere...until I took Bear out for a walk. I saw a little girl of about 4 walking to a party with her Mummy. She had a sweet dress on and a pearl necklace. That was it! My daughter has lots of necklaces with pearls in and if Daisy's was like her Mummy's she would also be more like to wear it. In my stash I have some good "faux" pearls and I got them out.
Rather than a fiddly clasp I used one of the fixed clasps I had made in my silversmithing class a while back for my jewellery stash.
I used the round one on the right.
I found 3 beads worked well between the pearls
and here it is


So the real test was would Daisy like it and wear it instead of her Mummy's necklaces...?
I think the cheesy grin says it all. She wore it all the time she was here, even down to my studio.
However she decided to keep it safe whilst she crafted and she put it in its little organza bag next to her.

Just look what she made
Yes we were in Halloween mode...LOL. She got out some brown distress inks too.
When Daisy and Co went home I decided to continue crafting in the same autumnal colours Daisy had got out.  I made a fairy card using my Lavinia stamps I won in the summer. I also wanted to enter some fun challenges which started in September. I created the monochromatic background by blending my Distress inks and made a moon by masking as I blended. I love the sentiment.
This will be making its way down to Dotty's this week as my fairy cards seem to go down well there. I am also starting to change my colour palette as I am so inspired by the changing seasons. So it will soon be out with the summer cards and in with my autumnal inspiration.

I would like to enter my card into the following challenges;

That's Crafty 1/3 all square my card is 5 1/2 by 5 1/2 " square
Crafty Catz 1/3 anything goes with an autumnal twist
Simon says stamp Wednesday anything goes
Simon says stamp work it Wednesdays 2/3 stamping
Mod squad foliage
Ribbon girl 1/3 September card challenge
Card Mania 1/3 earth tones
Time out 1/3 trees/leaves
The Artistic Stamper 1/3 Monochrommatic
The Emerald faeries monchrommatic
Penny Black and more add a sentiment

Thanks for your kind visits to me today. I hope you enjoyed your weekend? We finally had some well needed rain overnight. My garden welcomed it as the lawn was getting quite parched. The sunshine is due to return again mid week so it appears that we are still hanging onto summer for the moment.

Back soon,

Bye for now,

Jane x


Wednesday, 15 June 2016

On show

I only have 2 more silversmithing classes left for this year. There is an annual exhibition, which is held in the library, to show work by the students for all the crafts taught at our college.

It has been up for nearly 2 weeks and finishes in a few days time so I went to have a look yesterday.
We are allowed to exhibit any piece of work so I chose a pendant I made which is one of my favourites.

These are pretty grim photos as I didn't have my camera with me but by next week it will be over so I took a couple of snaps to share with you on my phone.

It's lovely to see everything set up


 My work is number 35...the pendant set with a beautiful dendrite agate stone.
and to show you closely here is a photo below from my file on my computer. It was very fiddly to make the setting but worth the effort.
I always think of this as a little winter's snow scene ;0)

My card today is certainly not a wintry snow scene but something very appropriate for this Sunday, which is Father's day. It's one I made for Dotty's Teahouse and it went down very well.
I used a Mo Manning digi which I coloured with Promarkers and highlighted with Prismacolor pencil.
The stamped sentiment is by LOTV.
I would like to enter my card into the following challenges;


DP2 anything goes #264
ABC J for just how you like it
Try it on Tuesday all about him
Die cuttin Divas Father's day
Crafty Boots masculine cards
Double D challenges all about the boys

Thanks as always for your kind visits and sweet comments you take the time to leave. I am still sorting out my fun Peppa Pig visit photos and hope to be back to share them on Friday...such a fun day out.

Back soon,

Bye for now,

Jane x


Thursday, 2 July 2015

Guest design spot for the Crafting Muskateers....something very different

I am delighted to have been invited to guest design today for the lovely ladies over at the Crafting Musketeers. The theme for their July challenge is anything goes so do pop on over and join in the fun. What I love about the Crafting Musketeers challenge is that it is not restricted to paper crafts. Anyone can enter anything crafty at all.

With that in mind I decided to share my recent jewellery make for this post. If you are a first time visitor to Jane's Journal you may not realise that I also make jewellery and I attend a weekly silversmithing class. My class finished for the summer break recently and this is the most recent piece I made. I wanted to make a summer necklace for myself using sea glass and shells collected from our Greek islands holidays. My Hb and I go at least once a year and I always take a walk along the shore line looking for treasure.

I took some time planning my design for a pendant to which I would attach the sea glass. I drew it out first on paper. Part of our design brief was to also include some beading so I decided to use pearls. I cut the pendant from a piece of silver, textured it in the rolling mill and drilled holes to take the handmade claws.
I came up with a design using 2 pieces of sea glass

I made the shells using a 2 part moulding compound into which I pressed my real shells
I then used the moulds made them using silver metal clay.

. I decided to make my bail out of 2 shells. I drilled holes in them so that I attach the thread.

and then had fun (not!) making the claws.


They are made from silver wire and left uncut until finishing.  I had to drill holes in the base and solder them in place. I then tried several placements of the silver shells and once I was happy I soldered them in place.

I then cut down and filed the claws to points

Next I carefully placed the beach glass pieces and pushed over the claws.

Once the pendant was finished it was time to design the beads. I used freshwater pearls, Sworovski and green glass beads. I used a heart toggle clasp from my stash to finish everything off.

So here is my finished piece and I must admit I am delighted how it turned out.


 It was a real labour of love but worth every drop of blood sweat and tears I put into it. I would like to thank the ladies over at Crafting Musketeers for inviting me to Guest Design today. Do pop over to their great challenge blog and join in with the fun and remember that you can enter any craft. The theme is anything goes. Good luck to everyone.

I would like to enter my necklace into the following challenges;

Country View  on your travels
Allsorts Blue as the ocean
That Craft Place layers

Thanks for visiting  me here today and for the kind comments you take the time to leave. I would also like to warmly welcome my newest followers  July is the month of my bloggerversary and I have decided to make something special to celebrate for my annual giveaway.  I have used one of my spare silver shells to create a little summer pendant and I have also made a pearl,coral and shell necklace. I will be giving all the details on my blog on 26th July but as a sneak peek here is a photo.........


Keep cool, it was 36c in my garden in the shade yesterday....phew I have not felt it that hot for years in England. Wimbledon on Tuesday was just amazing...back soon with some photos. I have got to travel up to London today for a course....I feel a sticky journey may well be ahead ;0)

Back soon,

Bye for now,

Jane x