I wanted to share with you some more of my recent silversmithing projects from my class. This one was to make a set of stacking rings with at least one containing a "tube" set stone.
There is no need for me to place an alert at the beginning of this post as I had a happy outcome and made a very sweet set of stacking rings. To prove it here they are!
They were so hard to photograph to show the purple colour of the lovely amethyst stone that I ended up resorting to using a bulb of garlic to put them on. I actually think they look quite good there but there was no clever thinking behind my use of a prop, more a case of "What can I grab that's near!"
This again was a very interesting project. I first had to make the tube setting for the amethyst.
Here are 2 amethysts I had sitting in my stash. I chose the one which had the most uniform oval shape. Next to it is the silver tubing. Yes it is round and you may think how can you make a setting that is oval with a round tubing?
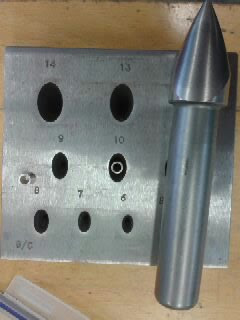
Well, you need one of these....
A metal former.
I measured and sawed a small piece of tubing and placed it in the former. You can see the cut piece of tubing sitting in the number 10 oval. Using the large forming tool (seen on the right) you hammer your way through the holes until the size is reached. I worked from size 10 down to size 6. Each time the metal was struck you needed to re anneal it to keep it from hardening. This process took some time to complete.
I then had to cut and form 3 ring blanks. Each one is made from round silver wire. Here they are rough cut before I had filed and soldered the joints shut. For the other 2 rings I decided that I would use my silver metal clay flowers which I had spare from the course I attended last year.
I thought having one each side of the amethyst would balance the set of rings well.
Next it was a case of carefully soldering the stone setting and the flowers to the centre of the ring blanks. The white you can see here is tippex which we use to stop the soldered joint melting whilst we solder other areas. Water based tippex works really well. You can see it was quite a balancing act and tricky to line everything up.
Next I put the setting for the amethyst into a ring clamp. I then placed the stone inside and carefully pushed over the edges and then burnished to smooth everything. I soldered the 2 silver flowers to the other 2 ring blanks and there we have.....a stacking set of rings and a happy ever after project....................................
So how about continuing this "happy ever after" theme with my card challenge news. Unbelievable I found out on recently that I am a winner again. Have a look here. There was more happy dancing going on in this house!
I also promised I would show you my prize winnings when they arrived...
A lovely Big Penny Black stamp
A second big wood mounted Penny Black Stamp
and this lovely stash from America. What a lucky girl I am.
You may have noticed recently that I have also taken off my Comment Verification, as requested by many of the card challege blogs. It makes it easier and quicker for them to visit the many blogs they need to.
The other point is that Blogger has changed comment verification to 2 (yes 2!) words which are actually really difficult to work out. I am struggling myself with people's blog who have this turned on. If you have any concerns you can have "moderation" on your settings and you can read any comments before they are posted. I seriously suggest you consider taking off comment verification as this really is a pest now with 2 unreadable words!
If any comments that are put on you do not like you can easily delete them.
Now finally for a very special card I made. This is actually a "fun" card for my darling son who is 23 on Friday. He has always loved giraffes so I had to use the fun Penny Black stamp I own.
It's actually an easel card, this is the card standing up.
Here is the cute image which I coloured with my trusty Promarkers and highlighted with my Prismacolor pencils.
I added some die cut glitter card balloons and tied ribbons to them.
This shows the inside where I shall write our birthday greeetings on these tags.
and this side view shows how the card stands up. These take a long time to make but are really fun for those extra special cards.
I would like to enter my card into the following card challenges.
Paper Sundaes #108 Happy Birthday
Papercrafting Journey #3 cute
Ladybirds craft Ink Spring is in the air
Penny Black Allsorts Bingo my line is Turquoise, cream, brown
Stamping for the weekend colour theme
Although he never reads my blog I am sending my dear son special birthday wishes for Friday. Despite his age and size (he stands 6'2" tall) he will always be my "baby"...now that would make him blush ;0) Happy birthday fella!
Thanks as always for your lovely visits to my little part of blogland. I so enjoy reading all your comments and I thank you for taking the time to leave them. Happy Wednesday everyone. We are promised the dizzy heights of 14c over the next few days......fingers crossed as it's wet and dull today.
Bye for now,
Jane x


