Monday, 6 February 2017

Frozen

No not the film but some super photos my son took during the recent cold snap. We had pretty cold night time temperatures and he and his dear GF took a trip with Bear to Frensham. This is such a beautiful spot in the Surrey countryside, at any time of the year. Sometimes we all go as a family as it's a good halfway spot to meet up.

It had been so cold at the time that the pond (to be quite honest to me it's more a lake!) froze and he sent me some hilarious photos of Bear skidding on the ice from his phone.

How beautiful it looked in the sunshine, despite the minus degrees temperatures that day.
However the following photo really made me smile as I knew it would be perfect to make an art journal page with . 2 lovely boys, one frozen lake.
I wanted to make a piece for several challenges running at the moment in blog land. Lots of  the themes feature love, using masks, being young at heart and even the February verse of "The Months" poem by Sara Coleridge.

So this is what I got up to ....I selected some suitable Distress inks and crayons.

First I scribbled on some crayons and blended them roughly with water. After drying I blended the blue and green distress inks onto my page.

I then used a tree mask and blended more ink through it to create a woody background in my journal. I just repeated using the mask until my page was full of trees.


The crayoned areas were supposed to represent the rain in the poem,
"February brings the rain, thaws the frozen lake again. "
However I decided I wanted something much bolder and knew that I had just the right stamp in my stash.....


I just love this Designs by Ryn stamp, one of my favourites....I stamped it all over and then added some white gel pen to accent the droplets.


Next I needed a little cherub so I found this little Tim Holtz stamp. I coloured it with Distress Markers and fussy cut it out.


I also  found some inky snippets in my stash and used these to die cut some hearts with . I wanted lots of love on my page.


I also ran some blue and brown card through a bark embossing folder to tie in the woods theme of my journal page.


I made a frame for the photo.
and then having made all my elements I was ready to play with my design.

I put on my creative hat..........................
and this is what I came up with.
A few close ups...my little cherub and heart in place (needed by the Craft Barn) I also used my Artistic stamper calligraphy stamp again.
 The inky hearts represent the frozen lake ...and my love for these 2 boys 💕

The mask I used to create the trees background
and one last shot
My art journal page was made for the following challenges;

PaperArtsy masks

The Craft Barn 12 Month challenge  February with the extra twist of a cherub and heart.

Designs by Ryn customer creation February

Time Out inspired by words I was inspired by the words of the poem

Noor Design UK 2/3 have a heart

The Artistic stamper 2/3 love hearts I used my Artistic stamper calligraphy stamp

Craft Heaven 3/3 love is all around

Simon says stamp Wednesday the colour of love my card shows it doesn't always have to be red....

Dies R Us 2/3 hearts

Let's Craft and Create 1/3 love is in the air

The Paper Girls Challenge with heart

Simon says stamp Monday young at heart

We love to create 1/2 anything mixed media


Sometimes all you need is a photo of someone you love to spark off your creative muse. 
Thanks for all the love you left for me and my dear friend in my last post, it was so kind.
I hope you all enjoyed the weekend and managed to get some time to get creative.

Enjoy the week ahead and thanks for your kind visits.

Back soon,

Bye for now,

Jane x

Saturday, 4 February 2017

Falling in love with my Gelli plate

On Thursday I had a change to my plans. I was going to meet my dearest and oldest friend Karen for ladies' lunch but very sadly her dear Mum is very seriously ill and she is at the hospital. We  have been best friends since the age of 11 so obviously I needed something to distract me at such a sad time.

Now I have had a Gelli plate for *whispers* a couple of years and I confess I have never even taken it out of the packet. It is one of those things that needs a good few hours to play with and to be quite honest I have never had the time. So it was the perfect time to play.

Now if you are not interested or are already a dab hand with  Gelli plates I would suggest you scroll down to check out my card...otherwise grab a cuppa.

Here it is

Yes it's just a small one 3" x 5" as when I got it ( I used some prize winning money from the Craft Barn) I decided that I would start small to see if I liked it. They come in lots of sizes and shapes now.
I have watched lots of You Tube videos over the years but decided that the best thing to do was to grab some bits and pieces, dive in and just play.

There are lots of fun challenges around including Love,colour palettes, using words in our art and even bubble wrap (It was recently National Bubble Wrap day in the USA according to Darnell!) so I decided to incorporate them into a special card for my BF.

I chose these colour Paperartsy Fresco Paints for the colours over at Rubber Dance. Pink is also Karen's favourite colour. Yes...we are opposites in one way only...our favourite colour, as I am so not a pink girl 😉
I chose some stencils, bubble wrap, stamps and even a doily to add texture with. 


I got out my brayer and off I went..starting just with cheap paper and progressed to cheap (Wilko) water colour paper.


pulling off lots of prints..such fun


The bubble wrap gave such a cool print.
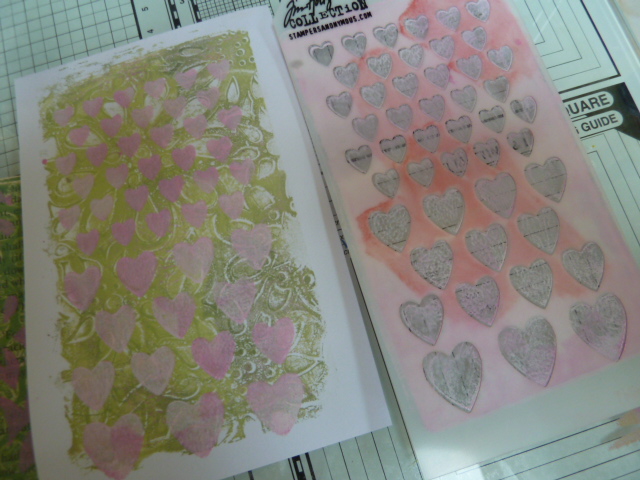
The small Tim stencils fitted perfectly over my Gelli plate.
I love this effect with the hearts over the floral base


I cleaned my brayer onto a piece of watercolour paper as I worked.
and by the end had this
far too pretty to throw away....so I added some Rubber Dance floral stamping using Watering Can Archival ink which is a lovely grey.
Yesterday I went back to my prints and I decided to use this one as a backing for my words.
I searched my stash and found the perfect one....I think these words are very appropriate at a time like this. I stamped and embossed it.


I used some of these prints to die cut some hearts to show my love.


I cut a piece of my "clean up" masterboard as my card backing.
I then used my fave Artistic Stamper Latin mini calligraphy plate stamp on my die cuts. This is particularly apt for Karen and I as we were both useless at Latin but had such fun with our lovely Latin teacher...Mrs Clifford. She took such a shine to us both and we had many hilarious times with her...happy days and memories. 

Now that I had all my elements made it  was them time to put on my creative hat and come up with something special.....here it is. 
You can see my Gelli plate prints clearly in here. I edged everything with Pumice Stone distress ink and used grey card with the pink to mat it with.
 I added a few sequins to give it some sparkle and add some more sunshine to my card.
and one last photo

My card was made for my dear Karen...and for the following challenges;

Darnell's  NBUS #10 2/3 My Never before used stuff is of course my Gelli plate and I even managed to create using Bubble Wrap!

Join our Challenge:

A Vintage journey words that are special 

The Artistic stamper 1/3 love hearts I used my Artistic stamper calligraphy stamp


Craft Heaven 2/3 love is all around

Simon says stamp Wednesday the colour of love my card shows it doesn't always have to be red....

Dies R Us hearts

Shopping our stash Days of Yore

Uniko anything goes I have also gone for the optional love twist.

Paper creator love is in the air  

In the pink 1/3 with love

Thanks as always for your visits and kind comments. After a wet Friday afternoon and evening it looks like it might be dry, if chilly, for us here in the South of England.
Hold on to the thought that above the clouds the sun does indeed shine. Sending sunshine, and hugs if you need them to you all, especially my dearest Karen.  Have a lovely weekend.

Back soon,

Bye for now,

Jane x


Wednesday, 1 February 2017

February, the love month

Hello and welcome to February, the month of love and time for our next challenge over at Country View. I spotted this display up in London recently..such gorgeous heart boxes...ready to fill....


Our theme this time is a timed challenge. The brief is to make a project in 30 minutes or under. For this I decided to make a card. I could never make an art journal page in that sort of time! I think a lot of time is spent on design so I will confess that I already had a plan but in minutes to make it really did take less than 30 minutes. There are no limitations to the number of other challenges or the number times you can enter. You have the chance to win a £20 voucher too so it's win win in my books! All the details can be seen here. 

So this is what I got up to. We all have a bag of inky left over snippets in our stash don't we? Us crafters never throw anything away.
 I dug out the piece below. I had made it for the background for a Christmas card but when I added silver embossing paste I got a pink tinge, from the sparkly spray underneath. At the time I really didn't like it. However for a background to a Valentine card it was perfect. I just quickly distressed the edges. Time taken; 1 minute
 To make it more "Valentiney" is that a word??...I added some red archival ink through my heart stencil, sprinkled on some red geranium embossing powder
 and heat embossed the hearts. I also added a little to the edges. Time taken 5 minutes.
I have a little stash of digi images all cut with my stitched rectangle die and chose this one which is a free Graphics Fairy image.  I always have spare frames cut so I just tucked a rectangular Joy frame behind it.
Next I got out some of my inky mop up scraps and die cut lots of hearts. I added some script stamping to some of them using my Visible Image Bronte border. Time taken 10 minutes

I found these old paper doilies in a drawer I was clearing out after Christmas
so I stamped the same script onto one of these.
Then it was just a case of sticking everything together.

with a couple of close ups


Time taken; 9 minutes 

Total time = 25 minutes.....so 5 minutes to spare!

So using scraps is a really quick way of putting a card together...and remember never throw away those rejected backgrounds. There will always be a day that you can put it to use 😊


I would like to enter my card into the following challenges;

Darnell's NBUS challenge #10

NBUS stands for never used stuff...of which I have plenty. My never before use for this project was my paper doilies which had been sitting in a drawer for probably 15 years...yes seriously!!

Crafty Catz 1/3 anything goes with a twist of a ladies' card

Allsorts let's celebrate

Crafty Card makers 1/3 love, love, love

Love to create 2/2 anything creative/ mixed media


Thanks for visiting today and for all you kind comments that you take the time to leave me. I so appreciate them.
Happy February everyone....share the love 💓💖💓

Back soon,

Bye for now,

Jane x